Links and Images
Connecting Documents to the World
You've learned how to structure documents with headings, organize information with lists, and show code with fenced blocks. Now you'll learn the final elements that make your markdown documents truly useful: links to connect to external resources, images to show what things look like, and emphasis to highlight critical information.
These are the final syntax elements you need for writing effective markdown files like READMEs, CLAUDE.md instructions, and project documentation.
Concept 1: Links - Connecting to Resources
A document doesn't exist in isolation. You often need to reference external documentation, examples, or standards. Links solve this problem.
Why Links Matter
When you write "Use Python's requests library," the reader might not know:
- What is the requests library?
- Where do I find it?
- How do I use it?
But if you write "Use Python's requests library," the reader can click through to complete documentation instantly.
The Syntax
Markdown links follow a simple pattern:
[link text](url)
- link text = what the reader sees and clicks
- url = where the link goes
What you type:
Read the [Python documentation](https://docs.python.org/) for help.
What it renders as:
Read the Python documentation for help.
Common Mistake: Spaces in URLs Break Links
Beginner mistake:
[Wrong link](https://docs.python.org/3/ reference guide)
This won't work because the space breaks the URL. Either:
- Use a URL without spaces (recommended):
[Python reference](https://docs.python.org/3/reference/)
- Or use URL encoding (replace space with
%20):
[reference guide](https://docs.python.org/3/reference%20guide)
For documentation, always stick with option 1 – find clean URLs without spaces.
Common Mistake: Vague Link Text
Never use "click here" or "link" as your link text:
Wrong:
For more information, [click here](https://docs.python.org/).
See the [link](https://requests.readthedocs.io/) for details.
Correct:
See the [Python documentation](https://docs.python.org/) for more information.
The [requests library documentation](https://requests.readthedocs.io/) has examples.
Why this matters for AI: AI agents use link text to understand what the destination provides without following the link. [Python documentation](...) tells AI it's a language reference. [click here](...) provides zero context—AI must guess or follow the link (which it often can't do).
Links in specifications serve as context anchors for AI agents. When you link to library documentation, you're telling the AI: "This is the authoritative source for how this works." Some AI tools can fetch linked URLs to understand APIs better. Even when they can't, the link text provides semantic context—[requests library](...) tells the AI you're using the Python requests package, not just making generic "requests."
Example 1: Links to Documentation
Here's how to add helpful links to a README:
# Weather App

## Required Libraries
- [Python requests library](https://requests.readthedocs.io/) - for making API calls
- [OpenWeatherMap API](https://openweathermap.org/api) - free weather data source

## Data Format
Data should be formatted as JSON. See the [JSON specification](https://www.json.org/) for details.

## Testing
Verify your app works like the examples in the [OpenWeatherMap docs](https://openweathermap.org/current).
Now readers can click through and see:
- How to use the requests library
- Where to get weather data
- What JSON looks like
- What sample outputs should look like
Instead of describing resources, you're pointing directly to them — readers get answers in one click.
For documents with many links, markdown supports reference-style links that keep your text clean:
Read the [Python docs][python] and [requests library][requests] documentation.

[python]: https://docs.python.org/
[requests]: https://requests.readthedocs.io/
The link definitions go at the bottom of your document. This is optional but useful for long documents.
AI Colearning Prompt
Explore with your AI: "I'm writing a README for a project that uses three external libraries. Can you show me how to format a 'Dependencies' section with links to each library's documentation? Use real library URLs."
Concept 2: Images - Showing What Things Look Like
Sometimes words aren't enough. You need to show what something looks like. That's where images come in.
Why Images Matter in Documentation
Images help readers understand:
- What the UI looks like - Screenshots show expected interface
- How data flows - Diagrams explain system architecture
- Project branding - Logos make READMEs professional
The Syntax (Very Similar to Links!)
Markdown images use almost the same syntax as links, with one difference — an exclamation mark ! at the start:

- alt text = description of the image (shown if image doesn't load, read by screen readers)
- image-url = where the image is located (web URL or local file path)
What you type:

What it renders as:
![]()
Where Images Come From
Option 1: Online images (easiest for beginners) Use a direct image URL from the web:

Option 2: Local images in your project
Put images in a folder (like images/ or assets/) and reference them with a relative path:

For beginners: Start with online image URLs. Later you can add local images to your projects.
Important for AI-native development: Modern AI models are multimodal—they CAN see images when given visual access. However, when AI reads your markdown files as text (common in coding workflows), it only sees the  syntax, not the actual image. Descriptive alt text serves two purposes: (1) accessibility for screen readers, and (2) providing context when AI processes your spec as a text file. Instead of , write .
Example 2: README with Images
Here's how images make READMEs more professional:
# Weather Dashboard

## Features
- **Display** current temperature and conditions
- **Show** 7-day forecast
- **Save** favorite locations
## Architecture

A screenshot replaces a paragraph of description, and a diagram can explain architecture faster than any list.
Common Image Mistakes
Mistake 1: Forgetting the ! at the start
[Missing exclamation](image.png)
This creates a link to the image, not an embedded image. Always use ![...] for images.
[text](url)= Take me there (clickable link)= Show it here (embedded image)
The ! means "display this content inline" rather than "navigate to this location."
Mistake 2: Broken image paths

If screenshot.png doesn't exist at that path, the image won't show. Check your paths!
Mistake 3: Too many large images
Don't embed 20 screenshots in one README. Use images strategically:
- 1 logo/banner at the top
- 1-2 key screenshots showing the app
- Diagrams only when words aren't enough
Practice Exercise
Ask your AI: "I'm writing a README for a task management app. I want to show what the main interface looks like and a simple architecture diagram. Suggest what images I should include and help me write descriptive alt text for accessibility."
Concept 3: Text Emphasis - Highlighting What Matters
Sometimes you need to draw attention to specific words or phrases within your text. Markdown provides two levels of emphasis: bold for strong emphasis and italic for lighter emphasis.
The Syntax
Bold uses double asterisks or double underscores:
What you type:
This requirement is **critical** for security.
This requirement is __critical__ for security.
What it renders as:
This requirement is critical for security.
Italic uses single asterisks or single underscores:
What you type:
See the *optional* configuration section.
See the _optional_ configuration section.
What it renders as:
See the optional configuration section.
Combined (bold italic) uses triple asterisks:
What you type:
***Never*** store passwords in plain text.
What it renders as:
Never store passwords in plain text.
When to Use Each
| Emphasis | Syntax | Use For |
|---|---|---|
| Bold | **text** | Critical requirements, warnings, key terms |
| Italic | *text* | Optional items, definitions, slight emphasis |
| Both | ***text*** | Absolute requirements, security warnings |
Example: Emphasis in Specifications
## Security Requirements

- User passwords **must** be hashed before storage
- API keys should *never* be committed to version control
- All endpoints **require** authentication
- Rate limiting is *recommended* but optional for internal APIs

***Critical***: The database connection string contains credentials
and must be stored in environment variables, not in code.
Emphasis helps AI understand priority. When AI sees "must" vs "recommended", it can distinguish between hard requirements and nice-to-haves. Use bold for requirements that would cause implementation failure if missed, and italic for optional enhancements. This semantic distinction helps AI make appropriate trade-off decisions during implementation.
Common Emphasis Mistakes
Mistake 1: Overusing bold
If everything is bold, nothing stands out. Reserve bold for truly critical items.
Mistake 2: Inconsistent emphasis for placeholders
Don't use italic alone to indicate placeholders like database_name. Instead, use inline code with angle brackets: <database_name>. This is clearer for both humans and AI.
Mistake 3: Using emphasis instead of structure
If you're bolding entire sentences to make them stand out, consider using a heading or callout box instead. Emphasis is for words within sentences, not for creating document structure.
Try With AI
Test your understanding of links and images by building a real README section.
Setup
Use any AI assistant you have access to — ChatGPT, Claude, Gemini, or another tool.
Prompt 1 (Links Practice):
I'm writing a README for a Python weather app that uses the requests library
and the OpenWeatherMap API. Write me a "Getting Started" section that includes
links to the relevant documentation. Use proper markdown link syntax.
Expected Outcome:
Your AI will generate a section with properly formatted [text](url) links:
- Links pointing to real documentation pages (requests, OpenWeatherMap)
- Descriptive link text (not "click here")
- Clean URLs without spaces
Prompt 2 (Images Practice):
Now add an "Architecture" section to my weather app README. Include a placeholder
image showing the data flow (user → app → API → response). Use proper markdown
image syntax with descriptive alt text.
Expected Outcome:
Your AI will create an image reference using  syntax:
- The
!prefix that distinguishes images from links - Descriptive alt text explaining what the diagram shows
- A placeholder URL or reference to a local image path
Prompt 3 (Combined Practice):
Review this README section I wrote and suggest improvements to my links and images:

## Resources
- Python docs: https://docs.python.org
- API info at openweathermap.org

Screenshot:
[app screenshot](screenshot.png)

What markdown syntax errors did I make? Fix them for me.
Expected Outcome:
Your AI should catch at least three errors:
- Bare URLs without proper link syntax (
https://docs.python.orgneeds[text](url)format) - Missing
!on the image (creates a link instead of an embedded image) - Vague alt text that doesn't describe the image content
Practice Exercise: Task Tracker App (Part 4 - Links & Images)
Continuing from Lesson 4: Open your Task Tracker App specification. You'll now add links and images to complete your first full specification.
Your Task for Lesson 5
Add links and images to finalize your Task Tracker App specification:
Part 1: Add Resource Links
Add a "Resources" or "Documentation" section with helpful links:
## Resources

- [Python Official Documentation](https://docs.python.org/) - Language reference
- [Python File I/O Tutorial](https://docs.python.org/3/tutorial/inputoutput.html) - For saving tasks to file
Part 2: Add a Placeholder Image (Online URL)
Add a screenshot placeholder showing what your app's interface looks like:
## Screenshot

Part 3: Try a Relative Path (Local Image)
In AI-native development, AI agents often create images (diagrams, charts) and save them locally. Practice referencing a local image:
- Create an
images/folder in your project - Add any image file (or create an empty placeholder)
- Reference it with a relative path:
## Architecture Diagram

This prepares you for when AI generates diagrams and saves them to your project folder.
Write alt text that describes what the image SHOWS, not just what it IS. "Task Tracker menu" is vague. "Task Tracker main menu showing 5 options" tells the reader (and AI) exactly what to expect.
Validation Checklist
Check your completed specification:
- Has at least one working link to external documentation
- Links use proper syntax:
[text](url)with no spaces in URL - Link text is descriptive (not "click here" or "link")
- Has at least one image with descriptive alt text
- Image uses proper syntax:
with!at the start - Alt text describes what the image shows, not just what it is
- (Bonus) Includes a relative path image reference like
./images/diagram.png
Common Mistakes to Avoid
Mistake 1: Using "Click Here" as Link Text
Wrong:
For more info, [click here](https://docs.python.org/).
Correct:
See the [Python documentation](https://docs.python.org/) for more info.
Descriptive link text tells both humans and AI what the destination provides — without needing to follow the link.
Mistake 2: Forgetting the ! for Images
Wrong (creates a link, not an embedded image):
[App screenshot](screenshot.png)
Correct (embeds the image):

Remember: [text](url) = take me there.  = show it here.
Mistake 3: Overusing Bold Emphasis
Wrong (everything bold = nothing stands out):
**All** **users** **must** **log** **in** **before** **accessing** **data**.
Correct (bold only the critical word):
All users **must** log in before accessing data.
Reserve bold for truly critical terms. If everything is emphasized, nothing is.
Mistake 4: Vague Alt Text on Images
Wrong:

Correct:

Alt text should describe what the image shows, not just what it is. This helps both screen readers and AI agents processing your spec as text.
Why This Matters for AI
When you use links, images, and emphasis correctly in specifications, AI agents can:
- Follow documentation links - Some AI tools fetch linked pages for additional context
- Understand resource relationships - Link text tells AI what each resource provides
- Parse alt text for image context - When reading markdown as text, AI relies on alt text for image understanding
- Generate appropriate placeholders - When AI creates documentation, it follows your link/image patterns
- Distinguish priority levels - Bold (must) vs italic (recommended) helps AI decide what to implement first vs what is optional
Together, these elements transform a basic specification into a rich brief — one that gives AI context, examples, and clear priorities to work from.
Links, images, and emphasis each add a different dimension to your specifications. Links provide context anchors — connecting your spec to authoritative sources that AI can reference. Images provide visual contracts — showing what the result should look like. Emphasis provides priority signals — telling AI which requirements are non-negotiable and which are nice-to-have. Together, these elements transform a basic specification into a comprehensive brief that guides AI toward accurate, well-prioritized implementations.
Modern AI models are multimodal and can view images directly when given visual access. However, in text-based workflows (like reading spec files), AI sees only the alt text and filename. Write descriptive alt text that works for both scenarios—it helps accessibility AND provides context regardless of how your document is processed.
Bonus: Additional Markdown Elements
Before we wrap up, here are additional markdown elements you'll encounter in real projects.
Tables — Comparing Options
Tables are useful when you need to compare features, list configurations, or show structured data:
| Feature        | Free Plan | Pro Plan |
|----------------|-----------|----------|
| Task limit     | 10        | Unlimited|
| Collaboration  | No        | Yes      |
| Export to PDF   | No        | Yes      |
What it renders as:
| Feature | Free Plan | Pro Plan |
|---|---|---|
| Task limit | 10 | Unlimited |
| Collaboration | No | Yes |
| Export to PDF | No | Yes |
Key rules: Use | to separate columns and --- to create the header row. Alignment is optional — the columns don't need to line up perfectly in your source file.
Task Lists — Tracking Progress
Task lists add checkboxes to track what's done. This is a GitHub Flavored Markdown (GFM) extension:
- [x] Set up project structure
- [x] Create main menu
- [ ] Add task creation feature
- [ ] Add task deletion feature
What it renders as:
- Set up project structure
- Create main menu
- Add task creation feature
- Add task deletion feature
Syntax: - [x] for checked, - [ ] for unchecked. These render as interactive checkboxes on GitHub.
Escaping Special Characters
Sometimes you want to display characters like *, #, or [ as literal text instead of markdown formatting. Use a backslash \ to escape them:
 displays bracket syntax instead of creating a link.](https://pub-80f166e40b854371ac7b05053b435162.r2.dev/books/ai-native-dev/static/images/part-3/chapter-10/escape-sequences-backslashes.png)
Common characters to escape:
\*→ literal asterisk (instead of italic/bold)\#→ literal hash (instead of heading)\[and\]→ literal brackets (instead of link)\\→ literal backslash
How Newlines Work
Markdown handles line breaks differently than you might expect:
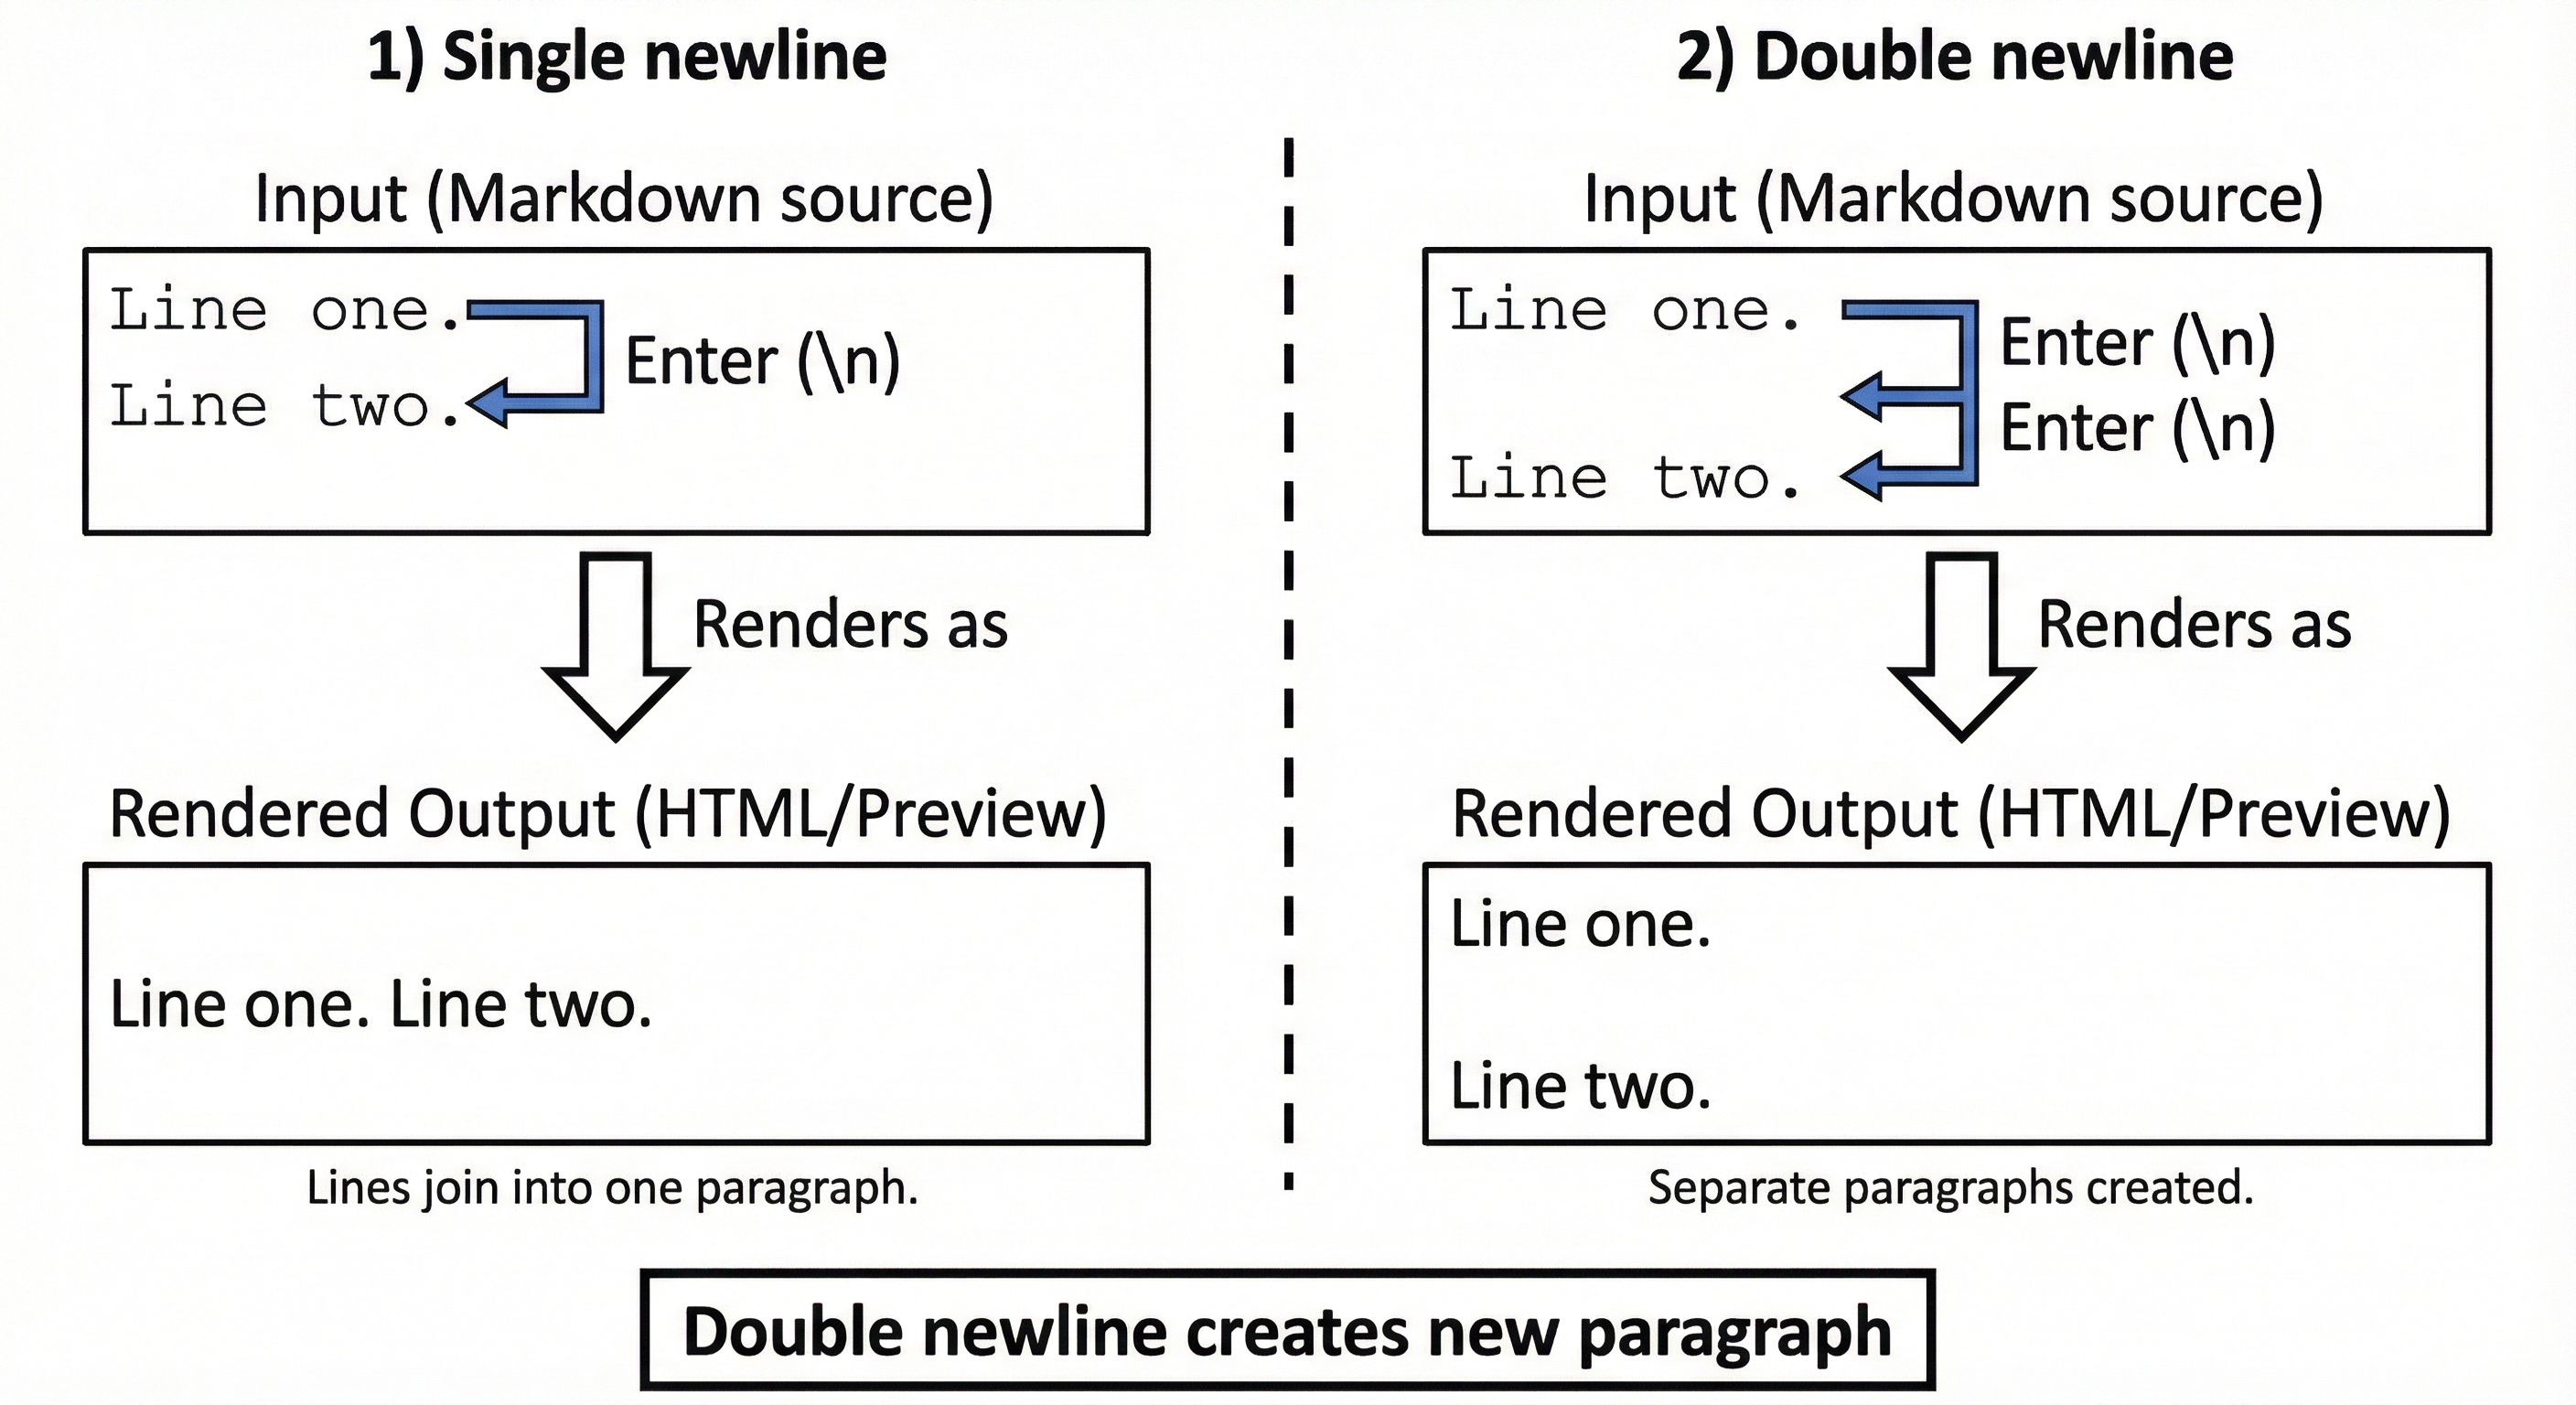
Key rule: A single newline doesn't create a new paragraph. You need a blank line (double newline) to separate paragraphs.
Line one.
Line two.
Renders as: "Line one. Line two." (same paragraph)
Line one.

Line two.
Renders as two separate paragraphs.
Your First Complete Specification
Congratulations! You've now built a complete specification across Lessons 2-5.
Your Task Tracker App specification now has everything an AI agent needs to understand and implement your project:
- Clear structure (headings)
- Organized requirements (lists)
- Concrete examples (code blocks)
- Supporting resources (links)
- Visual context (images)
Check Your Work
Compare your specification against this reference. Don't worry if yours isn't identical — the important thing is that it has the right structure and elements.
Reference: Complete Task Tracker Specification (click to expand)
# Task Tracker App
## Problem
People forget daily tasks and lose track of what they've completed.
A simple command-line tracker lets users manage tasks without
complicated software.
## Features
### Add Tasks
- Create tasks with title and description
- Set optional due dates
- Assign priority levels (high, medium, low)
### View Tasks
- Display all tasks with status
- Filter by priority or due date
- Show completed and pending separately
### Mark Complete
- Mark tasks as done
- Track completion timestamps
- Move completed tasks to archive
### Delete Tasks
- Remove tasks permanently
- Confirm before deleting to prevent accidents
## Expected Output
When the user runs `python tracker.py`, they should see:
```text
Task Tracker Menu
1. Add Task
2. View Tasks
3. Mark Complete
4. Delete Task
5. Exit
Choose an option: _
```
When viewing tasks, the display looks like:
```text
Your Tasks:
1. Buy groceries [Pending] - Due: 2025-11-08
2. Call dentist [Pending] - Due: 2025-11-07
3. Submit report [Complete] - Done: 2025-11-06
```
When the task list is empty:
```text
Your Tasks:
No tasks yet. Use option 1 to add a task.
```
## Installation
1. Install Python 3.9 or higher from python.org
2. Download the task tracker files from GitHub
3. Navigate to the project folder: `cd task-tracker`
4. Run the program: `python tracker.py`
## Resources
- [Python Official Documentation](https://docs.python.org/) - Language reference
- [Python File I/O Tutorial](https://docs.python.org/3/tutorial/inputoutput.html) - For saving tasks to file
## Screenshot

## Architecture Diagram

What to check in your version:
- One
#title, four##sections, four###feature headings - Features use bullet lists (unordered — order doesn't matter)
- Installation uses numbered list (ordered — sequence matters)
- Expected output uses fenced code blocks with
texttag - At least one link with descriptive text (not "click here")
- At least one image with descriptive alt text (not just "screenshot")
What's Next?
In the Chapter Quiz, you'll test your markdown knowledge. Then in Chapter 3, you'll use these markdown skills to write real specifications for AI agents — turning structured documents into working software.